Setting up Nginx as a reverse proxy using Docker
Published: 2019-10-22 | Last Updated: 2021-02-02 | ~30 Minute Read
Why?
I have been looking at some cloud technologies lately, specifically kubernetes, and since docker is at the heart of it, or containers anyway, I decided to learn about the core tech that makes these technologies work. I had never used this kind of technology up until about a year ago, so it’s still all fairly new to me.
I have a couple of services that I like to run for myself, however they’re all using virtualization instead of containerization so I wanted to test how this new way of doing things stacked up against the previous.
Setting up
I will be using Slackware 14.2, I will be installing docker CE from the slackbuilds scripts as well as docker-compose. At the time of writing the versions of each package are as follows:
Docker:
  $ docker version
  Client:
   Version:           18.09.2
   API version:       1.39
   Go version:        go1.11.9
   Git commit:        6247962
   Built:             Fri Sep 20 03:53:54 2019
   OS/Arch:           linux/amd64
   Experimental:      false

  Server:
   Engine:
Version:          18.09.2
API version:      1.39 (minimum version 1.12)
Go version:       go1.11.9
Git commit:       6247962
Built:            Fri Sep 20 03:51:30 2019
OS/Arch:          linux/amd64
Experimental:     false
Docker Compose:
 $ docker-compose --version
 docker-compose version 1.21.1, build 5a3f1a3
I will be using the official Nginx image from Docker Hub as well as the kanboard project management software and three URL shorteners Yourls, polr and lstu.
Configuration
I started with the Nginx container, as this will be used as the reverse proxy. To set up the initial configuration, I took a look at the official Nginx configuration here for setting up reverse proxies. So setting up a couple of servers within the Nginx configuration is what we needed to do.
I created the initial configuration file that only proxied requests for the kanboard application in order to test that it was working as expected. The Nginx configuration file looked like this for the kanboard proxying:
  server {
  listen       80;
  server_name  kanboard.domain.name;

  location / {
      proxy_pass http://kanboard;
      root   /var/www/app;
      index  index.html index.htm index.php;
  }

  error_page   500 502 503 504  /50x.html;
  location = /50x.html {
      root   /usr/share/nginx/html;
  }
  }
I then saved this configuration as the default.conf file that the docker container image uses according to the docker hub Nginx documentation. The breakdown of the file is pretty simple, the entire configuration is enclosed in a server directive according to Nginx’s documentation. Then we include the rest of the configuration within this definition. We start with the listen directive which we use the default web port 80 on for testing purposes, we will set up SSL in a bit.
We then define the server_name which is an important part since this is what allows different requests targeting the same port to be handled correctly by Nginx and sent to the expected back end service. The server name should generally be defined equally on both the application and the proxy server.
We then move on to the location directive, this is where the proxying happens in Nginx, this instructs the web server where to pass the received request. We then move on to the proxy_pass instruction, in this specific case since we will be using docker compose in order to define a shared network (the created containers will be able to see each other by the container name that we define) we will set this value to http://kanboard.
Now we define the root directive with where the kanboard application has it’s document root. Finally we define the type of pages to serve in the index directive and the errors to use if necessary, we will keep the default ones.
With this file created and ready to be tested I defined the Dockerfile for the Nginx container with the following entries:
   #Get the base image for the reverse proxy
   FROM nginx:latest

   #Copy the configuration for the reverse proxy from localhost
   COPY default.conf /etc/nginx/conf.d/
With that the Nginx portion of the configuration was complete, now for the Kanboard configuration. From looking at the documentation from the kanboard page, I learned that I did not need to change anything from the image except that I like the plugins that kanboard offers (Thank you community!) and found that the default since version v1.2.8 is for plugins to be disabled. So I created a Dockerfile that includes a configuration file into the container which enables this feature. The kanboard config file looks like the following:
  <?php

  defined('ENABLE_URL_REWRITE') or define('ENABLE_URL_REWRITE', true);
  defined('LOG_DRIVER') or define('LOG_DRIVER', 'system');

  define('PLUGIN_INSTALLER', true); // Default is false since Kanboard v1.2.8
And the docker file to build the kanboard container like this:
  # Download the base/official kanboard image
  FROM kanboard/kanboard:latest
  # Include the custom config.php file which has plugin installation from UI enabled
  COPY config.php /var/www/app/data/
With that the environment was set and ready for the testing to finally begin. I created the docker-compose.yaml file that we would be using with the following content:
  version: '2.2'
  services:
proxy:
  build:
    context: .
    dockerfile: Dockerfile-proxy
  container_name: proxy
  ports:
    - "80:80"
  cpus: 0.2
  mem_limit: 128M
  networks:
    - test-net

kanboard:
  build:
    context: .
    dockerfile: Dockerfile-kanboard
  container_name: kanboard
  expose:
    - 80
  volumes:
    - kanboard_data:/var/www/app/data
    - kanboard_plugins:/var/www/app/plugins
    - kanboard_ssl:/etc/nginx/ssl
  cpus: 0.2
  mem_limit: 128M
  networks:
    - test-net

  volumes:
kanboard_data:
  driver: local
kanboard_plugins:
  driver: local
kanboard_ssl:
  driver: local
  networks:
test-net:
I will be using version 2.2 of docker compose since I found that version 3 is mainly for docker swarm compatible features and since we will not be using docker swarm for this deployment, I’ll stick with V2.2 of the specification since we will be using the cpus option and this is the version that supports it vs just V2.
The docker compose file is divided in three main sections, the definition of services (the applications we’re deploying), the definition of the volumes that our services will be consuming and the definition of the network that we will be creating for our services as well.
In the services section we defined two services, let’s take a look at each of the definitions:
The proxy service
The excerpt from the file that defines the Nginx container configuration is the following:
proxy:
  build:
    context: .
    dockerfile: Dockerfile-proxy
  container_name: proxy
  ports:
    - "80:80"
  cpus: 0.2
  mem_limit: 128M
  networks:
    - test-net
It is important to be familiar with the yaml syntax in order to make general sense of why the sections are laid out the way they are. I reference the ansible documentation because that seemed a bit more comprehensive of a guide than the actual official YAML documentation.
The proxy section is the name of the service that we will be defining, this can be anything you like. Since we will be using Dockerfiles for both of our containers (due to the custom configuration files we are adding) we need to add the build section, here we define the context with a . which means that we will have all the necessary resources in the same directory that we call the docker-compose command from. Since we have more than one service being built we are also defining the specific Dockerfile name that we want to use for each build via the dockerfile option.
We then move over to the container_name option where we give a name to the container that will be created, this is different from the service name in that the docker container that actually gets created will be given this name and can be seen when we execute commands like docker ps later.
With the ports section we define which external port (on the host machine) will be mapped to which internal port (the container), in this case we will simply use port 80.
We then define the cpus option, this will limit the CPU usage on the host for this container, this is simply in order to keep the container from hogging up more resources than we would like. The mem_limit as you might expect is for the same reason but for RAM utilization.
And this is where the realization of the power of containers hit me…Will we really be able to run an application with these little amounts of resources?..We shall find out.
The last thing we defined was the network that the service will be attached to, we use the networks section and under it the actual name of the network. That completes the definition of our Nginx container, on to the kanboard config.
The kanboard service
Here is the config section from our docker-compose.yaml file:
  kanboard:
build:
  context: .
  dockerfile: Dockerfile-kanboard
container_name: kanboard
expose:
  - 80
volumes:
  - kanboard_data:/var/www/app/data
  - kanboard_plugins:/var/www/app/plugins
  - kanboard_ssl:/etc/nginx/ssl
cpus: 0.2
mem_limit: 128M
networks:
  - test-net
The configuration for this service is very similar so I won’t go over the same sections. There are a couple of differences however, mainly the expose and the volumes sections. The expose section is different from the ports section in our proxy configuration in that it exposes the port internally only. This means that from the outside network (the internet, or even the host machine) we can’t access the container over the network, but other containers that are attached to the same network can. This is perfect for our use case since we only want traffic from the outside world to be hitting our proxy.
The second difference is that we defined volumes for our kanboard application. This merely assigns storage space from the local host to the container, this means that the container will be using local storage in order to store data. If this is not configured the data that is written to the container will be ephemeral. In other words if you have an application that uses a database, like kanboard, without persistent storage you will lose all your data as soon as that container is destroyed. This means that all your projects and their tracking progress would be deleted and we don’t want that.
The Volumes
Something we have to do is prepare the local hosts' storage space to be used by docker. This is done by setting up the volumes section in the docker-compose.yaml file. Here we define the volumes that we will have our containers use. In our specific example we defined the three volumes that the kanboard application will use as per their documentation. Nginx will not need persistent storage as we’re simply using it to pass requests and nothing more.
The Network
Like I mentioned previously the containers will be attached to a network that we define, well this is where we define the network. If we don’t define the network here, docker will not know the network that we’re trying to attache the containers to, thus attaching them to the default network. So we need to define the network so that our containers get attached, see each other and be isolated from any other networks.
So with that we’re finally ready to deploy our first test run of the reverse proxy web server. Remember that we have to keep all the files in the same folder. The config, Dockerfiles and docker-compose.yaml files will be in the same folder. This is not entirely necessary since you could have separate folders and simply define paths to their respective locations, but I found myself editing and moving these files around too much during my testing so I just decided to keep everything together for better efficiency.
We run the following command:
$ docker-compose up -d
And with luck we should be seeing output that looks like the following:
  Creating network "services_test-net" with the default driver
  Creating volume "services_kanboard_data" with local driver
  Creating volume "services_kanboard_ssl" with local driver
  Creating volume "services_kanboard_plugins" with local driver
  Building proxy
  Step 1/2 : FROM nginx:latest
  latest: Pulling from library/nginx
  8d691f585fa8: Pull complete
  047cb16c0ff6: Pull complete
  b0bbed1a78ca: Pull complete
  Digest: sha256:77ebc94e0cec30b20f9056bac1066b09fbdc049401b71850922c63fc0cc1762e
  Status: Downloaded newer image for nginx:latest
   ---> 5a9061639d0a
  Step 2/2 : COPY default.conf /etc/nginx/conf.d/
   ---> 5cfb136da9a8
  Successfully built 5cfb136da9a8
  Successfully tagged services_proxy:latest
  WARNING: Image for service proxy was built because it did not already exist. To rebuild this image you must use `docker-compose build` or `docker-compose up --build`.
  Building kanboard
  Step 1/2 : FROM kanboard/kanboard:latest
  latest: Pulling from kanboard/kanboard
  9d48c3bd43c5: Pull complete
  53ca53883d3d: Pull complete
  705f5f8b3450: Pull complete
  09ada7a5184a: Pull complete
  048103c22cda: Pull complete
  Digest: sha256:1dd586d1254dcb51a777b1b96c6ea4212895b650b9348a6a2325efe26d7b7348
  Status: Downloaded newer image for kanboard/kanboard:latest
   ---> 8a7515f46d23
  Step 2/2 : COPY config.php /var/www/app/data/
   ---> 4dce398b01df
  Successfully built 4dce398b01df
  Successfully tagged services_kanboard:latest
  WARNING: Image for service kanboard was built because it did not already exist. To rebuild this image you must use `docker-compose build` or `docker-compose up --build`.
  Creating proxy    ... done
  Creating kanboard ... done
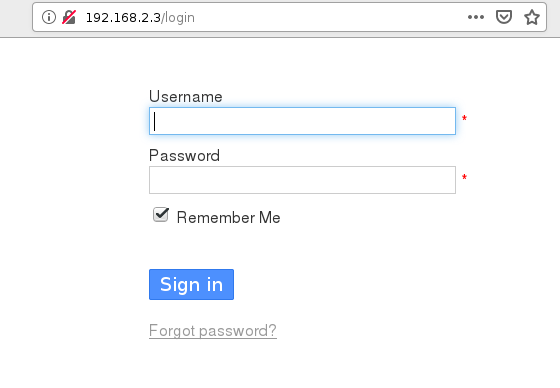
With that we can now go to our browser and type in the IP address of our host server, we should be able to reach the kanboard login page.
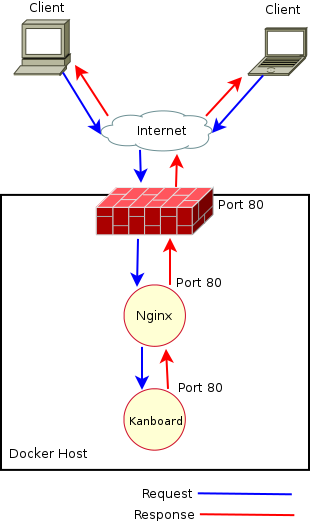
What we have now accomplished from a birds eye view would look like the following:
At this point you can of course log into the Kanboard application and set up new users and new projects and use it as you normally would.
One thing that we can do in order to triple check that the requests are indeed going through the proxy server and then being passed over to the kanboard server would be to run the docker stats command in a terminal while accessing the kanboard application from the browser. You should be able to see the memory and CPU usage going up as the requests come in and are handled by the kanboard application.
Note
Before moving on I like to bring everything down by executing docker-compose down this will stop the containers and remove them as well as the network that was created. Since we created persistent volumes those will, well persist, so in order to delete them we have to execute the docker volume prune command. This command will ask for confirmation before removing the persistent volumes. Please make sure you don’t have any important information on these that is not backed up, as you will lose all the information on these volumes when you confirm their deletion. Since this is just for testing I have no problem doing this.
SSL Configuration
Now that we have this set up we can move on to setting up SSL for kanboard. For this example we will use a self-signed certificate. The way we will do this is by issuing the following command:
  openssl req -newkey rsa:4096 \
  > -x509 \
  > -sha256 \
  > -days 365 \
  > -nodes \
  > -out kanboard.crt \
  > -keyout kanboard.key
This will give us something like:
  Generating a RSA private key
  ......................................................................................................................................++++
  ......................................................................................................................................................................................................................................................................................................................................................................................................................................................................................................................................++++
  writing new private key to 'kanboard.key'
  -----
  You are about to be asked to enter information that will be incorporated
  into your certificate request.
  What you are about to enter is what is called a Distinguished Name or a DN.
  There are quite a few fields but you can leave some blank
  For some fields there will be a default value,
  If you enter '.', the field will be left blank.
  -----
  Country Name (2 letter code) [AU]:
At this point we can go ahead and enter the required information. Once we have done that we should have the two files that we specified in the out and keyout directives for the openssl command.
The files in our case are:
  $ ls
  kanboard.crt  kanboard.key
Now we update the Dockerfile that will build the proxy container in order to copy the newly created files into the proper location inside the image. This way when we start the container the keys will be ready to be used. The updated Dockerfile would look like this:
  #Get the base image for the reverse proxy
  FROM nginx:latest

  #Copy the configuration for the reverse proxy from localhost
  COPY default.conf /etc/nginx/conf.d/
  COPY certs/kanboard.crt /etc/nginx/kanboard.crt
  COPY certs/kanboard.key /etc/nginx/kanboard.key
With these files now available we need to change our Nginx configuration file default.conf to include these new settings for SSL.
The new file would look like the following:
   server {
   listen       80;
   return 301 https://$host$request_uri;
   }

   server {
       listen 443 ssl http2;
       server_name kanboard.domain.name;

       ssl_certificate /etc/nginx/kanboard.crt
       ssl_certificate_key /etc/nginx/kanboard.key

   location / {
       proxy_pass http://kanboard;
       root   /var/www/app;
       index  index.html index.htm index.php;
   }

   error_page   500 502 503 504  /50x.html;
   location = /50x.html {
       root   /usr/share/nginx/html;
   }
   }
We added a server block for HTTPs and the simply left a redirect in the block for HTTP. We also added the location for the SSL certificate and key files that we created earlier. This should be enough for the Nginx configuration. Now we have to edit the configuration for the Nginx container in the docker-compose.yaml file, we simply add the port mapping for our incoming HTTPS connections:
 proxy:
   build:
 context: .
 dockerfile: Dockerfile-proxy
   container_name: proxy
   ports:
 - "80:80"
 - "443:443"
   cpus: 0.2
   mem_limit: 128M
   networks:
 - test-net
We also have to update the docker-compose.yaml file for the kanboard container to listen internally on port 443, that would be as simple as changing the line in the expose section. The fact that this will just work is due to the pre built configuration that Nginx on the kanboard images comes with. If you would like to take a look at that you would have to access the container while it’s running with something like docker exec -it <container-ID> /bin/bash.
   kanboard:
build:
  context: .
  dockerfile: Dockerfile-kanboard
container_name: kanboard
expose:
  - 443
volumes:
  - kanboard_data:/var/www/app/data
  - kanboard_plugins:/var/www/app/plugins
  - kanboard_ssl:/etc/nginx/ssl
cpus: 0.2
mem_limit: 128M
networks:
   - test-net
In the case of the kanboard service we don’t have to make any changes to the Dockerfile that will build the image, what we have will suffice in its case.
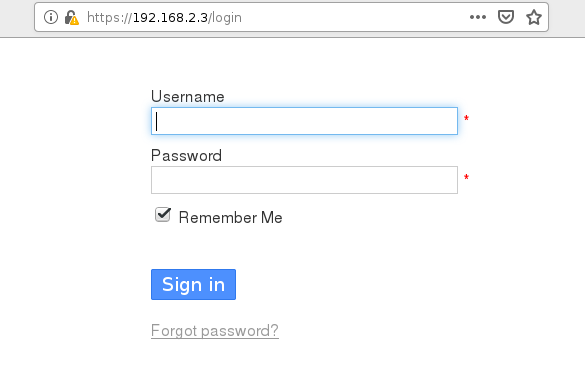
At this point you should be able to access kanboard via HTTPs from your browser:
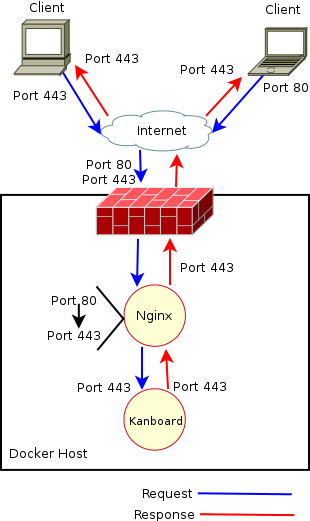
From a birds' eye view, the network diagram would now look like the following:
We have made it quite far, now we just have to set up three more services to be behind this web proxy server, let’s do it!
Setting up YOURLS with Docker
Now that we have our proxy working with kanboard it’s time to move on to the first URL shortener YOURLS. For this to work we need to have MySQL set up also, so we will need a MySQL image from docker as well. Once we have that we should be able to set things up fairly quickly.
Getting our requirements from Docker Hub
After reading the YOURLS documentation I found out that the specific image version that we need for MySQL is 5.7, so we run the following command:
docker pull mysql:5.7
We will also be needing the YOURLS image of course, so we pull that using the following:
docker pull yourls
With that we should have the two images that we will need in order to make YOURLS shorten URLs for us.
Setting up our Nginx Proxy Configuration
The main part of this section of the setup will be configuring Nginx in order to serve requests for both applications (I presume we will do something similar later for remaining two). So the first thing to do here would be have a look at the way we will organize our configuration. We could have everything in a single file, but as we add applications this will become more complex to maintain. What we will do instead is manage each application’s individual configuration in its own .config file.
The first thing to do is to update the Dockerfile for the proxy image:
  #Get the base image for the reverse proxy
  FROM nginx:latest

  #Copy the configuration for the reverse proxy from localhost
  COPY kanboard.conf /etc/nginx/conf.d/
  COPY yourls.conf /etc/nginx/conf.d/
  COPY certs/kanboard.crt /etc/nginx/kanboard.crt
  COPY certs/kanboard.key /etc/nginx/kanboard.key

  #Delete the default config file from the container
  RUN rm /etc/nginx/conf.d/default.conf
We have added three things to this file:
- We will now be copying a file with the Nginx configuration for the kanboard container
- We will now be copying a file with the Nginx configuration for the yourls container
- We will be removing the default configuration file that comes with the container
These changes mean that we need to rebuild the image that was previously created, so you will need to check the container ID with the currently running proxy container:
$ docker images
This should show the container ID that you’re interested in, in case your container is currently running you would execute the following:
  $ docker stop <container-ID>
  $ docker rmi <image-name>
That should have deleted the image that was created previously allowing us to rebuild it.
In case your container is not currently running then you would simply do:
$ docker rmi <image-name>
Another way of doing this is by using docker-compose down in the same folder where all of our config files reside. This will bring down the container and delete it, it will also delete the network. Once this is done you can run the docker rmi <image-name> command.
Last but not least you can execute the docker volume prune command after all containers have been deleted in order to start from scratch.
Now we will create the contents of our .config files for each of the services that we will be deploying:
Kanboard config file:
  server {
  listen 80;
  server_name kanboard.slack.mx;
  return 301 https://$host$request_uri;
  }
  server {
      listen 443 ssl http2;
      server_name kanboard.domain.name;

      ssl_certificate /etc/nginx/kanboard.crt;
      ssl_certificate_key /etc/nginx/kanboard.key;

  location / {
      proxy_pass http://kanboard;
      root   /var/www/app;
      index  index.html index.htm index.php;
  }

  error_page   500 502 503 504  /50x.html;
  location = /50x.html {
      root   /usr/share/nginx/html;
  }
  }
The contents of this file are essentially the same as before, we are just separating them into their own file now.
YOURLS config file:
  server {
  listen 80;
  server_name yourls.domain.name;

  location / {
      proxy_set_header Host $host;
      proxy_set_header X-Real-IP $remote_addr;
      proxy_pass http://yourls;
      root   /var/www/html;
      index  index.html index.htm index.php;
  }
  }
The contents of this file contain the basic configuration in order to serve the traffic to the YOURLS back end. They are very similar in nature to the kanboard file.
Additionally I would just like to point out that the NGINX official documentation is awesome and I highly appreciated its clear and concise information throughout the research for this post specially this part of the proxying.
Setting up our YOURLS application
We are now ready to edit the docker-compose.yaml file, we will be adding two services so this is the file that is receiving the most changes:
 ...
 yourls:
  image: yourls:latest
  container_name: yourls
  expose:
- 80
  environment:
YOURLS_DB_USER: yourls
YOURLS_DB_PASS: password
YOURLS_SITE: http://yourls.domain.name
YOURLS_USER: yourls
YOURLS_PASS: passwerd
  cpus: 0.2
  mem_limit: 128M
  networks:
- test-net

 mysql:
   image: mysql:5.7
   container_name: mysql
   environment:
 MYSQL_ROOT_PASSWORD: passward
 MYSQL_DATABASE: yourls
 MYSQL_USER: yourls
 MYSQL_PASSWORD: password
   cpus: 0.2
   mem_limit: 256M
   networks:
 - test-net
   ...
I have only the two additional services shown here, the rest of the file is unchanged, and the yourls service would begin right after the kanboard services finishes. Don’t forget about the spacing for these services within the file, as this might give docker-compose syntax errors.
The structure of the YOURLS definition remains pretty much the same, the only new addition to it is the environment section. This section I found is quite handy as it allows us to configure the users and database information from the docker-compose file instead of having to create a new image with the custom information.
Likewise the MySQL container definition is very similar to what we have been doing in the past, and again we see the handy environment section helps us create a database upon creation and set up access to it.
The user information that we set on the MySQL service must match that of the DB information that we use in the YOURLS service as this will be what the YOURLS application uses to connect to the MySQL database.
With that done, we are now ready to fire up all the services and see the reverse proxy magic actually begin to happen. One thing that I did notice is that if we started all of the services at the same time (by using docker-compose up -d) there were errors with the YOURLS container not being able to make a connection to the database. This as I later found out was due to the amount of time that the MySQL service takes to come up vs. the time that it takes YOURLS to start trying the database connection. So before we start YOURLS we need to let the MySQL database to be fully up and ready for incoming connections.
This translates to executing this first:
$ docker-compose up -d mysql
That should yield us the following:
  $ docker-compose up -d mysql
  Creating network "services_test-net" with the default driver
  Creating volume "services_kanboard_data" with local driver
  Creating volume "services_kanboard_ssl" with local driver
  Creating volume "services_kanboard_plugins" with local driver
  Creating mysql ... done
After this though the database may still be working to get started so I found two ways to know when it is ready, the first is by monitoring the output logs from docker-compose, that would be done via:
$ docker-compose logs -f
This will show all of the logs from the containers that result from running docker-compose up -d, in our case we added the name of the service mysql so that docker compose only worked to bring that container up and nothing else.
From my experience using the above method the MySQL container shows a log alluding to the database being ready to receive connections, something like this:
  mysql       | 2019-10-21T04:39:11.564164Z 0 [Note] Event Scheduler: Loaded 0 events
  mysql       | 2019-10-21T04:39:11.564948Z 0 [Note] mysqld: ready for connections.
  mysql       | Version: '5.7.28'  socket: '/var/run/mysqld/mysqld.sock'  port: 3306  MySQL Community Server (GPL)
The second way to confirm whether the MySQL service is fully up is by using the docker stats command in order to monitor the currently active containers. This brings us to a small side note, in my testing creating the MySQL container I was initially getting an error which I found out was due to the allocated memory. I initially had 128MB of RAM allocated to the MySQL container and this was not enough memory for he MySQL service to come up. I got greedy I know, but by doubling the RAM for the container the MySQL service came up without any problems. 256MB of RAM seem to be more than enough as the container never exceeds 55% of RAM utilization.
Once we have confirmed that MySQL is ready for incoming connections we can let docker-compose bring the rest of the services:
$ docker-compose up -d
We can monitor the progress if we so desire, but everything should be OK as we have tested most of the services in the past.
We should now be able to see four containers in total up and running via docker ps. All that is left to do now is to (cross our fingers and) open our browser and try to access our kanboard and YOURLS application on the same port.
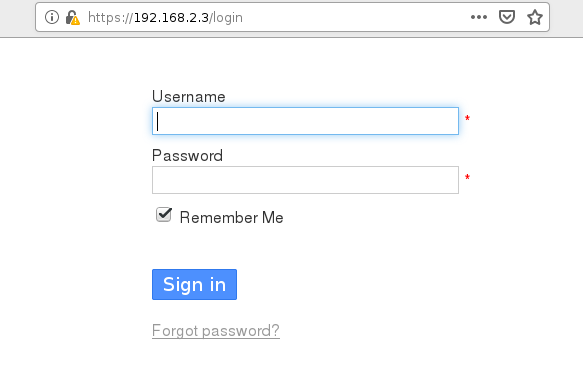
This is good, we at least didn’t break anything, now on to the new application.
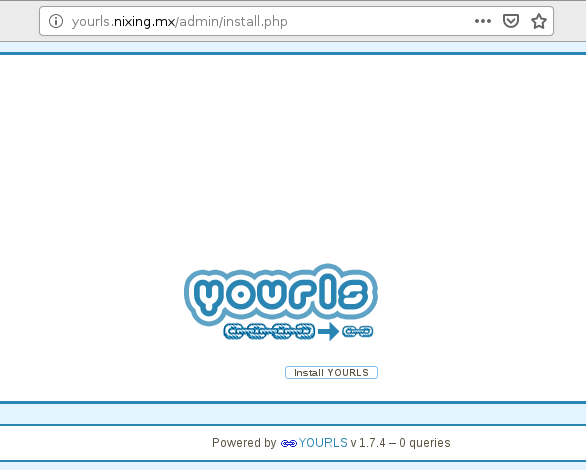
We are asked to install YOURLS, we click and…
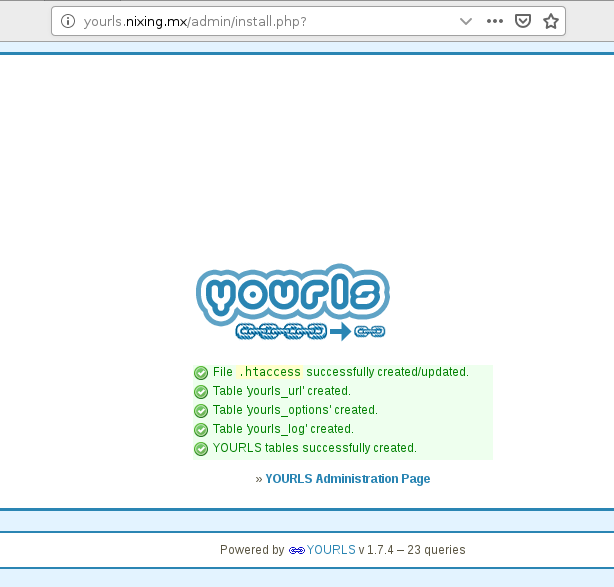
It seems like everything was installed correctly, now we go to the admin page by clicking on YOURLS Administrator Page.
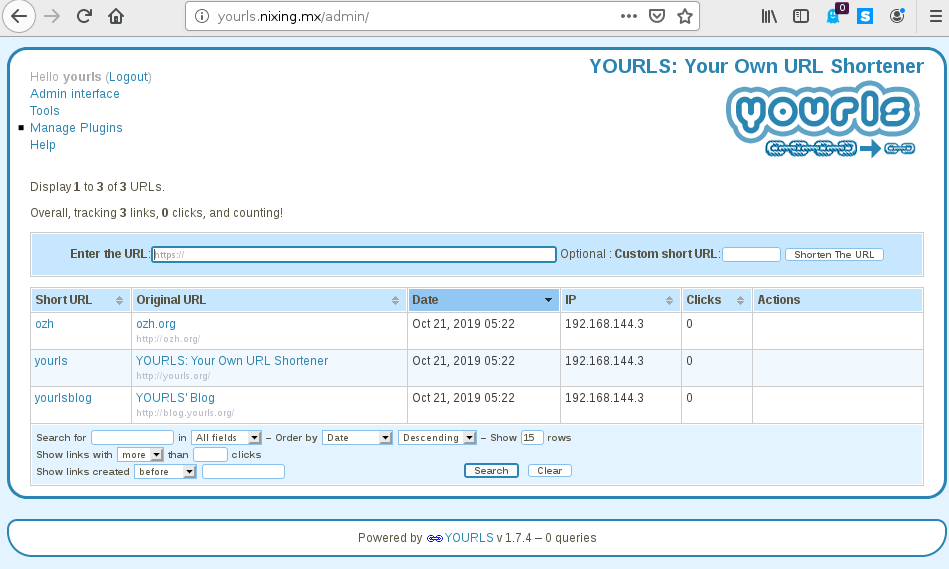
This is the admin page, success!
Just to be on the safe side I click on Logout to test the user credentials that we created via the docker-compose.yaml file.
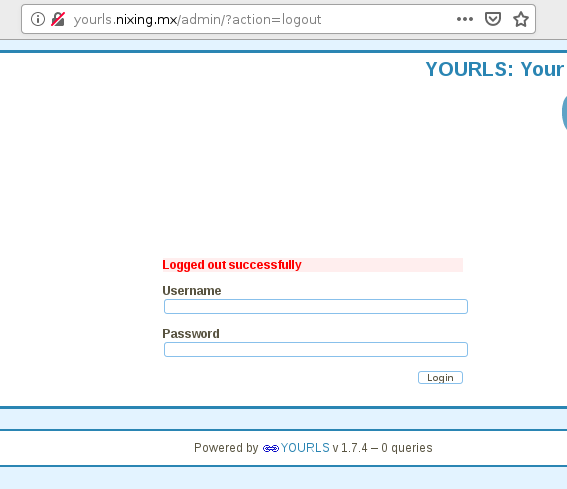
So once logged out I confirmed that I can log back in, great so everything is working as expected. As a side note I would like to point out that you need to add a /admin to the URL that you set in your browser for your domain. I was trying to have it not be that way so that you don’t have to add additional paths to your URLS but it seems like the way YOURLS is configured didn’t help much, so we’ll leave it like that for this test as we want to have a password enabled.
Now for the birds' eye view of our new configuration:
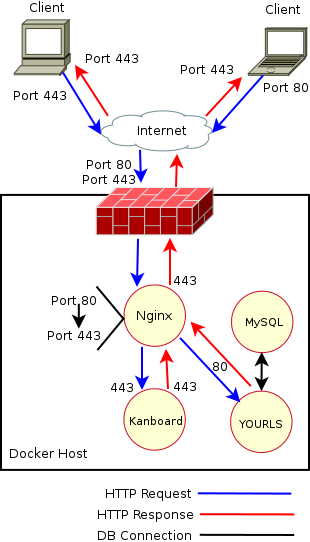
Great!, now what? We can shorten URLs left and right with YOURLS, but we’re hungry for more shortening! So we shall begin configuring Polr.
Setting up Polr with Docker
There is currently no official image from the Polr project for this URL shortener, so we will have to pull the non-official image from Docker hub. This image needs a database as well, however it seems that we can’t automatically create this database at the same time as the YOURLS application’s database inside the already existing mysql container, so we will have to either create a new mysql database or use the currently existing one, but manually create it by logging into the mysql container.
First we pull the non-official image for Polr:
$ docker pull ajanvier/polr
Configuring the Nginx Reverse Proxy for Polr
The configuration for Polr in Nginx should be pretty straight forward, we simply copy the same information that we had for the yourls.conf file to a new file called polr.conf and edit some of the lines, the end result should look like the following:
  server {
  listen 80;
  server_name polr.nixing.mx;

  location / {
      proxy_set_header Host $host;
      proxy_set_header X-Real-IP $remote_addr;
      proxy_pass http://polr;
      root   /src/public;
      index  index.html index.htm index.php;
  }
  }
Since we need to add this file to the Nginx container we need to rebuild it, so we have to bring down the container, delete the image that was created for our proxy container and then rebuild it. This all can be easily done with docker-compose. As we have done before we will execute:
  $ docker-compose down
  $ docker volume prune
  $ docker-compose up -d mysql
Remember to wait for the mysql service to be fully up in order to start working with it and bring up the rest of the services.
Manually creating a database in MySQL in Docker
We will reuse our existing MySQL database, so we won’t be setting up a new container for this. We have to access our MySQL database container with a shell, the way to do this would by executing the following:
$ docker exec -it mysql /bin/bash
In the above command we can access the mysql container by name due to docker-compose setting the name for us, another way would be to use the container ID, but using the name is I believe easier to use.
Once we have access to the container we want to connect to the MySQL service by running:
$ mysql -u root -p
This will ask us for a password, in this case it is what we defined under MYSQL_ROOT_PASSWORD which is our super strong passward.
We then need to run the following in order:
  $ CREATE DATABASE polr;
  $ GRANT ALL PRIVILEGES ON polr.* TO 'polr' IDENTIFIED BY 'password';
  $ QUIT
That should have created the necessary database as well as the user and password that will be using it and dropped you to the normal container shell, you can then type exit and that should be enough to get you back out to your host shell.
Once we have the database created we can need to do one more step, and that is the updating the docker-compose.yaml file.
Updating Docker Compose for Polr
Now we simply need to add the definition of our polr services to our docker-compose.yaml file and we should be good to start all the services. Our polr service block would look like the following:
polr:
  image: ajanvier/polr
  container_name: polr
  expose:
    - 80
  environment:
    - DB_HOST=mysql
    - DB_DATABASE=polr
    - DB_USERNAME=polr
    - DB_PASSWORD=password
    - APP_ADDRESS=polr.domain.name
    - APP_PROTOCOL=http://
    - ADMIN_USERNAME=admin
    - ADMIN_PASSWORD=passwerd
  cpus: 0.2
  mem_limit: 128M
  networks:
    - test-net
This should all look very familiar if you have been following along this entire time, we define the same parameters that we have in the past, and we simply use the provided documentation in order to set the environment definition with the information that we need. The breakdown of the environment settings is very well documented on the github for the non-official polr docker image.
With all that set up, we can now have docker-compose do the heavy lifting and bring up all the services like so:
$ docker-compose up -d
That should bring up the rest of the services with the proper configuration that we already had set up. We now try to access our new polr service and…
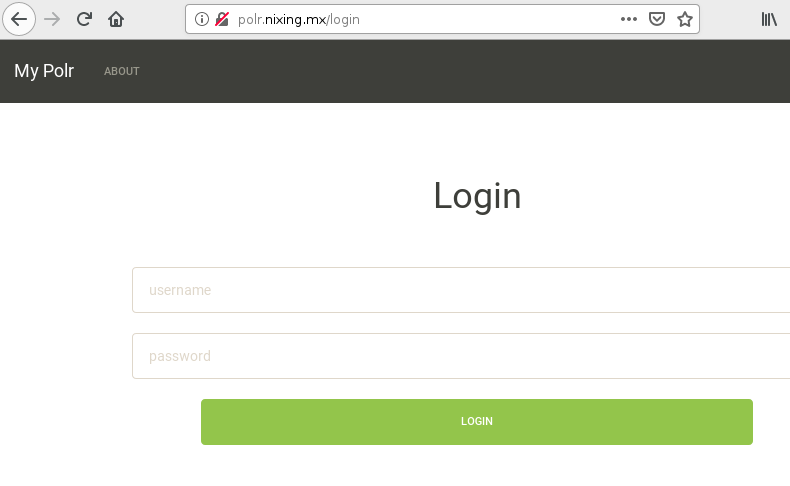
..Success! We can now login with the credentials that we initially set up and start shortening URLs.
So, that wasn’t so bad, our new and improved bird’s view would look like the following:
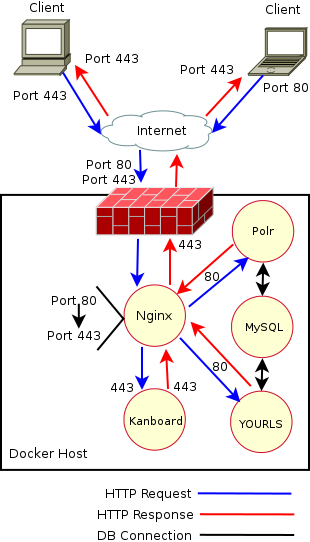
Awesome, so we’re chugging along pretty well, we just need to push a bit more and get that third URL shortener setup to have our URL shortening heaven…and Kanboard, On to lstu.
Setting up Lstu with Docker
So at this point setting up Lstu should be a breeze right? Let’s get to it. We will need the image from Docker Hub for Lstu (for Lstu there is no official image either), so we would run the following:
$ docker pull xataz/lstu
There should not be a need for a MySQL database this time around as this project includes a SQLite db integrated in the container, or so it seems. From reading the documentation related to this lstu image here, it seems like the db is integrated as there is no mention of it.
Configuring the Nginx reverse proxy for Lstu
So again this part should be straight forward, we copy our yourls.config file, rename it to lstu.config and update its contents in order to match the lstu information. The process should look a little like this:
  $ cp yourls.conf lstu.conf
  $ vim lstu.conf #Make changes
The final file should look like the following:
  server {
  listen 80;
  server_name lstu.domain.name;

  location / {
      proxy_set_header Host $host;
      proxy_set_header X-Real-IP $remote_addr;
      proxy_pass http://lstu:8282;
      root   /;
      index  index.html index.htm index.php;
  }
  }
Last but not least we need to update our Dockerfile for the proxy container, that should be a simple add. The final file should look like this:
  #Get the base image for the reverse proxy
  FROM nginx:latest

  #Copy the configuration for the reverse proxy from localhost
  COPY kanboard.conf /etc/nginx/conf.d/
  COPY yourls.conf /etc/nginx/conf.d/
  COPY polr.conf /etc/nginx/conf.d/
  COPY lstu.conf /etc/nginx/conf.d/
  COPY certs/kanboard.crt /etc/nginx/kanboard.crt
  COPY certs/kanboard.key /etc/nginx/kanboard.key

  #Delete the default config file from the container
  RUN rm /etc/nginx/conf.d/default.conf
That should be enough for the proxy to handle the requests properly, now on to the docker-compose.yaml file.
Updating Docker Compose for Lstu
This section too should be fairly straight forward, from looking at the Lstu documentation for this image, it seems like we don’t need much to get this container started. So our updated lstu service’s definition should end up looking like the following:
 lstu:
   image: xataz/lstu
   container_name: lstu
   expose:
 - 8282
   cpus: 0.2
   mem_limit: 128M
   networks:
 - test-net
So with that, all we have to do now is the same process:
- Bring down all the services with
docker-compose down - (Optionally) delete all volumes with
docker volume pruneand typing inywhen prompted - Delete the current proxy image with
docker rmi <image-name> - Start our MySQL database container with
docker-compose up -d mysqland wait for the service to be fully ready - Create the database for Polr manually inside the mysql container using the instructions provided previously
- Bring up the rest of the containers with
docker-compose up -d
And now for the final test, access your lstu installation and…
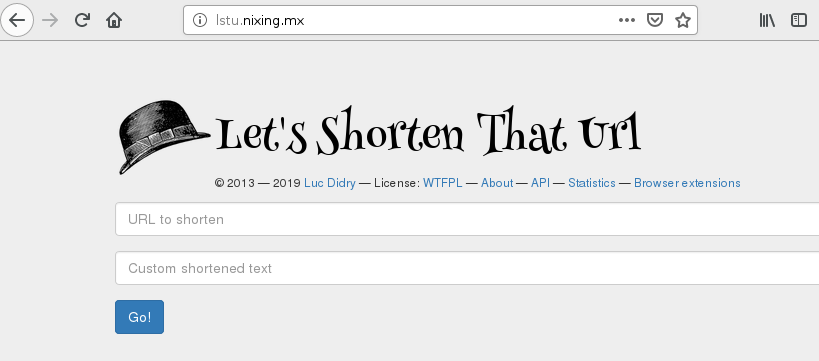
But will it shorten you ask?

Success! That last one was very simple compared to the previous two URL shortener setups. One thing to note is that we had to accommodate to the way that the image was built, we could have taken a look at the Dockerfile that was used to build that image and simply tailor it our needs, but for this example the image they used is what I went with.
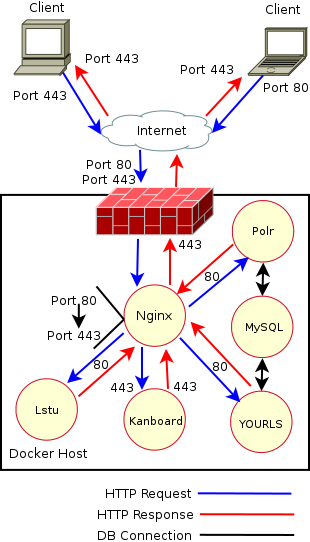
And for the final bird’s eye view:
Conclusion
Kudos to you if you went through this whole write up step by step, I hope it was entertaining! Before I wrap up I would like to point out the ease with which we can now deploy all of these services, we would simply perform the last list of steps I provided and we’d be up and running with all of our services ready to serve traffic. Not only would we be able to deploy custom configurations in minutes but we would also be able to do so on a plethora of systems, the only requirements?…The Docker environment / runtime that we had setup for this deployment!
This is the true power of Docker in my opinion, sure you can deploy a single container quickly, but entire systems tailored to my exact requirements in under 5 minutes?! (that’s an eyeball guesstimate, I didn’t time myself :P). I believe that is where the true potential of services like docker lies. There are many other things that we might consider like security and whether or not a db should have it’s own $3,000 USD hardware… but that’s a topic for another discussion.
For now I’m happy with what we built and oh yeah, take a look at resource usage from docker stats:
  CONTAINER ID        NAME                CPU %               MEM USAGE / LIMIT   MEM %               NET I/O             BLOCK I/O           PIDS
  d1c573528102        mysql               0.04%               140.3MiB / 256MiB   54.80%              19.2kB / 25.9kB     4.92MB / 603MB      28
  fc91b623052a        lstu                0.42%               101.2MiB / 128MiB   79.08%              65.2kB / 113kB      950kB / 117MB       6
  8b7f2c48ad07        polr                0.03%               26.22MiB / 128MiB   20.48%              31.5MB / 817kB      0B / 189MB          5
  ba0d3a5a5362        kanboard            0.00%               7.559MiB / 128MiB   5.91%               1.51kB / 0B         0B / 24.6kB         9
  ac3c73e0c6bd        proxy               0.00%               2.68MiB / 128MiB    2.09%               634kB / 632kB       0B / 0B             2
  03b9cecc3674        yourls              0.00%               10.59MiB / 128MiB   8.27%               2.12kB / 729B       0B / 8.19kB         6
All of these deployments are live at the expense of less than 512MB of RAM and hardly any CPU (at idle) and no more than 1GB RAM can be used up on the host and since we gave 0.2 cores of our CPU to each service, no more than 1.2 cores at at any given time either. I just really like that, with virtualization it would have taken way more than these resources to run these small little services.
Again, I hope you enjoyed this as much as I did.